 |
 |
 |
 |
 |
 |
 |
|
Check out our web directory of the UK
roofing and cladding industry
www.roofinfo.co.uk |
Sign up for our monthly news letter. |
|
|
|

In Part 1 we looked at the roof construction, up to the tiling or
slating of the roof around the prefabricated chimney or dormer window
units. In Part 2 we will look at the tiling and slating around the
units.
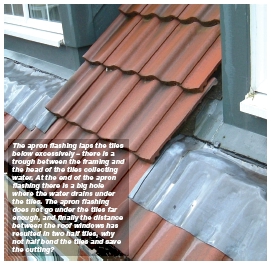
Apron flashing detail
With the chimney or dormer unit fixed in position, with the battens
gauged and fixed to the rafters, the lead apron flashing needs to be
turned back carefully to expose the top batten, which should be as close
to the chimney/dormer window unit as possible.
The top course of tiles/slates should be laid and
fixed. If the rafter pitch is 45º and above, all interlocking tiles
should be nailed, and may also need clipping. If the rafter pitch is 50º
and above, all plain tiles will need twice nailing, including any top
tiles. If top tiles are not used, the apron flashing should lap the
topmost tile by at least 165mm. If a cut course of tiles is used, the
head of the tile should be cut and new nail holes drilled to fix each
tile to the batten.
If there is a gap greater than 25mm between the head of
the tile and the unit framing, a timber support batten/board should be
installed with the top surface flush with the trough of a profiled tile,
or the top surface of a flat tile/slate. If the support board is any
higher, the first tile on either side will kick up. The lead flashing
should be dressed back onto the top surface of the tiles/slates.
Where the tiles are profiled they should be dressed
into each trough so that water is not trapped between the head of the
tile and the unit framing. At each end, where the flashing passes under
the first tile/slate on either side, the apron flashing should be
supported. A welt should be formed by turning the flashing over on the
diagonal to ensure water on the flashing does not drain off the ends.
Side abutment detail
The side flashings of the chimney/dormer window unit are generally an
integrated secret gutter that sits above the rafter level within the
batten depth. The edge tiles/slates will, therefore, lap onto the side
of the side flashing by a minimum of 100mm.
In most cases, the edge tiles/ slates should be
mortar-bedded onto the GRP side flashing, leaving a drainage channel
approx 50mm wide between the unit and the edge of the tiles/slates.
These dimensions will vary depending upon the design of the unit. With
tiles, the nib above the side flashing should be cut off to keep the
tiles from kicking up.
Depending upon the module of the tiles, and the overall
width of the unit, will dictate if a cut or half tile is needed. Where
possible, you should always try to finish with a full tile at the side
abutment, as a half tile will be almost impossible to fix to the batten
and may have no nib secured to a batten. With interlocking tiles, laid
half bond, this will be a problem, as you can not avoid the use of a
half tile. Some chimney/dormer units are designed to accept a separate
cover flashing. In these instances it is possible to install soakers for
use with double lap plain tiles and slates.
The first tile/slate on either side of the unit should
sit down tight onto the tile/slate below with the apron flashing dressed
between them, and should lie in the same plane as all the adjacent
tiles/slates. Any mortar bedding should not kick up the tile/slate.
As the edge tiles are considered to be perimeter tiles,
if the fixing specification for the roof requires the edge tiles to be
clipped then the tiles at the side abutment should also be clipped using
verge clips, including the first tile on either side. |
 |
|
This can be achieved by nailing the verge clip to the apron flashing
support board, provided it is at least 19mm thick, or by installing an
additional length of batten against the head of the lower course of
tiles.
Back gutter detail
It is essential that the perp lines up each side of the chimney/dormer
window unit should be maintained to ensure that at the back gutter the
tiles and slates line through correctly. This is more critical with
interlocking tiles as there is a limited amount of shunt that can be
used to correct the situation. The course of tiles/slates that run
through above the back gutter should all lay in the same plane as the
rest of the roof, otherwise the corner tiles/slates will not sit
correctly.
Where double lap slates/plain tiles are used, a course
of under eaves slates/eaves tiles are used, care is needed to ensure
that there is not a bond on bond at the corners. Therefore, if it can be
achieved, the roof should be set out such that the first full tile/slate
should lap across the corner to maintain the half bond. As with the side
abutment, the first course of tiles above the back gutter are also
considered to be perimeter tiles, and therefore if the perimeter
interlocking tiles need to be clipped, the first row of tiles will also
need to be clipped, using either eaves clips nailed into the tilt
fillet, which must be adequately fixed back to the rafters to ensure
that hurricane force wind uplift doesn’t rip the construction apart.
If it is not possible to safely fix into the tilt
fillet, an alternative would be to install a parallel batten 150mm away
from the leading edge and to install verge clips in a vertical position.
For this to work, the clip aperture will need to be reduced to the
thickness of one tile.
Conclusion
Preformed chimney/dormer window units would appear to speed up the
construction of a roof, but in so doing present problems for the roofer
trying to incorporate the tiled/slated roof covering around the ‘one
unit design fits all roof covering’ philosophy.
The choice of unit and the position of the unit by the
designer could save a lot of the problems. The detailing of the apron
flashing and the back gutter is often left to the roofer to resolve,
when it should be part of the chimney/ dormer window unit design.
Tips
- The tiles/slates around the
chimney/dormer window unit are considered as perimeters and should
be nailed/clipped accordingly.
- Avoid using broken bonded
interlocking tiles with chimney/dormer window units that have only a
preformed secret gutter side flashing.
- Do not puncture through the GRP side
and back gutter flashings unless it is a preformed tilt filet or
where the design specifically allows it.
|
| Compiled
by Chris Thomas, The Tiled Roofing Consultancy, 2 Ridlands Grove,
Limpsfield Chart, Oxted, Surrey, RH8 0ST, tel 01883 724774 |
|