 |
 |
 |
 |
 |
 |
 |
|
Check out our web directory of the UK
roofing and cladding industry
www.roofinfo.co.uk |
Sign up for our monthly news letter. |
|
|
|

There are particular roofing issues that relate to the installation of
chimney and dormer window units that need to be taken into
consideration. In this first section we shall look at the construction
up to tiling/slating the roof around the chimney/dormer window unit.
Design and construction
The position of the chimney/ dormer window unit should be determined
early in the design process to suit the layout of the room, or to
simplify the layout of the trussed rafter units. But consideration
should also be given to the module of the tiles/slates and the distance
from other features such as other chimney/dormer window units, the side
abutment, or verge.
Careful sizing and positioning can increase the security of the
roof and reduce the installation cost.
In the majority of situations the chimney/dormer
window units will be fixed to a timber trussed rafter, or attic truss
roof construction, although they are suitable for other constructions
like composite panels.
The opening width and length are predetermined by the
size of the units and the pitch of the roof, and should always be
trimmed top and bottom. Depending upon the weight of the units they
should also have a double rafter under the vertical wall faces, and
additional rafters and trimmers under the outer edges that form the side
and head flashings.
If the trimmers and additional rafters are missing, it
will be difficult to finish the underlay and battens around the
chimney/dormer window unit, and may result in long-term deformation of
the unit.
The additional rafters under the side flashings should
be positioned to allow the ends of the battens to be nailed to the
additional rafter. This may require a 50mm x 50mm batten nailed to the
side of the additional rafter to provide sufficient width to support and
nail the ends of the battens.
Underlay and battens
Across the bottom and up the sides of the units the underlay should be
fixed to the rafters before the unit is fixed into position. But at the
head, the underlay should lap onto the edge of the back gutter or
inclined valley, depending upon the design of the unit.
If the underlay laps onto the side flashings there is a risk of
water tracking between the underlay and the side flashing and dripping
into the roof. At the head, if the underlay laps under the back gutter
or inclined valley, any water on the underlay will run down between the
underlay and the unit and drain inside the roof. Often the
chimney/dormer window units are installed before the roof covering has
been started. It is best done in collaboration with the roofer.
The battens should be gauged out using the head and
tail of the units as fixed points. Depending upon the tile/slate module,
and the size of the units, a short course of tiles/slates may be
required. The side flashings and back gutter/ inclined valley are
designed to sit on the top surface of the rafters and can be up to 10mm
thick. The battens should be cut up to the edge of the side flashings
and fixed into the additional rafters to ensure there is a secure fixing
and should not be lapped onto the side flashing as this will cause the
edge tiles/slates to kick up.
Flashings
Some units have the apron flashing built in, while others have to be
installed separately. Regardless of which situation applies, the
flashing should be long enough to lap over the lower course of
tiles/slates. In many instances the flashing is just capable of
achieving 150mm of lap onto a slate that is butted up to the unit
framing, but is not long enough where the gauging-out results in a gap
between the head of the tile/slate and the chimney/ dormer window
framing, or where high-profile Roman or Pantiles are used, as the
flashing has to rise up to the height of the corrugation, reducing the
lap length. |
 |
Where the rafter pitch is less than 35º the length of
the flashing should be increased in accordance with the recommendations
of the Lead Sheet Association.
The flashing should either lap under the chimney/dormer
window unit by a minimum of 150mm, or, if the distance is less, turn up
to form a 50mm high vertical step within the unit construction. Where
the apron flashing extends under the side flashing it is not possible to
form a 50mm upstand, so the alternative has to be used. At this point
the apron flashing will be unsupported, so a timber support board should
be installed between the main rafter and the additional rafter, and to
the end of the flashing if it extends beyond the additional rafter.
At the junction between the upstand and the side
flashing, the apron flashing should not be cut, as that will form a leak
path. The flashing should be bossed, or a section welded in. Where the
flashing is dressed onto the head of the tiles it is common for the
flashing to form a trough between the framing and the tiles, which in
some cases is up to 100mm higher above the rafter face. Water that is
trapped in the trough can run sideways and under the first course of
tiles on either side. At this point there should be a welt to stop the
water flowing off the end onto the underlay. It is better to have no
trough there in the first place.
With profiled tiles the flashing should be dressed down
into each corrugation to allow the first tile on each side to sit
correctly into the tile below, without being kicked up.
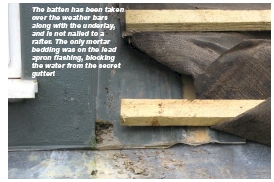
Back gutter
Where there is a back gutter arrangement there is often no tilt fillet,
or one of the wrong height. Each type of tile/slate will require a
different height of tilt fillet. Placing a loose timber batten on the
back gutter is not correct as it will be affected by water over time.
Mortar bedding the first row of tiles/slates will also
be incorrect as it will restrict any water on the underlay escaping. The
correct detail would be for the correct height of tilt fillet moulded
into the back gutter, or for a minimal tilt fillet moulded in with a
plastic ventilation grill of the right thickness, nailed into position.
Conclusion
Unless the basic construction, underlay, and battening is correct, what
follows will be uneven and insecure. The apron flashing and back gutter
detailing are also very important – water could seep into the building,
or, over time the construction will deteriorate. Part two will deal with
installing the roof covering around the chimney/ dormer window unit.
Tips
- All edges of the chimney/dormer
window unit should be fully supported and provision left for the
ends of the battens to be fixed to the additional rafters.
- The apron flashing should be long
enough to provide a minimum 150mm lap, avoiding the formation of a
trough that will collect water and discharge it sideways under the
adjacent tiling.
- The tiles/slates above the
chimney/dormer window unit should sit on a tilt fillet of the
correct height
|
| Compiled
by Chris Thomas, The Tiled Roofing Consultancy, 2 Ridlands Grove,
Limpsfield Chart, Oxted, Surrey, RH8 0ST, tel 01883 724774 |
|