 |
 |
 |
 |
 |
 |
 |
|
Check out our web directory of the UK
roofing and cladding industry
www.roofinfo.co.uk |
Sign up for our monthly news letter. |
|
|
|

Clay pantiles have been around for more than
2,000 years and so they have a good track record for keeping out the
rain and snow. But for those that have never come across them before,
they require a significantly different technique to setting out and
laying to that of concrete interlocking tiles, to ensure they perform
their function.Tiles
The traditional clay pantile is made up of a rectangular clay bat of
regular thickness, approximately 12mm-15mm, dried over a former into an
‘S’ shape with the right-hand edge turned down and the left-hand edge
turned up. The top right-hand corner and the bottom left-hand corner are
cut to a chamfer equal to the headlap and side lap, with a nib and nail
hole fixing moulded into the top edge normally at the bottom of the
trough, before being fired in a kiln. Clay double Roman tiles are
similar to pantiles with the exception of the shape being a semicircular
roll and flat trough combination.
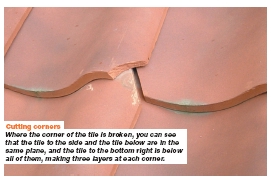
Corner chamfer
Interlocking clay tiles being of even thickness are laid and fixed to
horizontal timber battens just like any other roof tile with the
exception that for any given tile, the tile above and the tile to the
left are in the same plane. This is because for any given roof tile,
both the tile above and the tile to the left both lap onto the given
tile. Therefore, at each tile corner there would in theory be four
thicknesses of tile.
This would create gapping problems unless the
side laps were formed in the thickness of the clay tile body. This is
what is done with concrete interlocking tiles and the latest generation
of clay interlocking tiles from Sandtoft. By cutting off the top right
hand corner and the bottom left hand corner to the same angle or patter,
it is possible to butt the tile above and the tile to the left together
so they lay in the same plane. Then the tile to the top left of the
given tile laps over both the tile above and to the left of the given
tile. While this may sound very complicated, in reality it is very
simple. But without the corners being cut off the system would not work.
In reality the top left hand corner will be down and the bottom right
hand corner will be up, but this is hard to see with a tile with a
shaped top surface.
The traditional cut at the top right and bottom
left is a straight line, but with some designs is a zigzag or a curve.
Provided all the tiles have the same corner shape they will fit
together. This corner cut allows manufacturers to discourage tiles from
different manufacturers being mixed together. The cut starts along the
top or bottom edge equal to the side lap distance in from the edge. The
cut finishes down the side of the tile equal to the headlap distance.
The angle of the cut will be dependent upon those two dimensions.
Gauge
No two clay tiles are exactly the same because clay shrinks during the
drying and firing process, and will twist and move during the firing
process. Therefore, the tiles have to be laid to create the best fit,
and regardless of how good the tiles are there will be gaps generated
that will vary from tile to tile.
Because of the corner cuts, there is in theory no
variable headlap, and are considered to be fixed headlap. There is,
however, some adjustment in the shape of the tiles to cope with the
variance in the shrinkage of the clay.
Therefore, to determine the batten gauge that
should be used, a random sample of 12 tiles should be selected and laid
along the ground upside down with all the tiles shunted in. A distance
should be measured over ten tiles and divided by ten.The same process
repeated with the tiles shunted out and again the distance measured over
ten tiles and divided by ten. |
 |
|
The distance should be measured from nib
face to nib face where possible. The average of the two figures then
used to set out the batten gauge. Theoretically, you will gain a few mm
with some tiles and lose a few mm with others, but overall it will work
without the tiles riding up or losing headlap.
Coursing
The same process should be used to determine the coursing. Take the same
12 tiles and lay them along the ground lapping the side laps, first
shunting them in and then shunting out, measuring over ten tiles divide
by ten and average the result.
The horizontal coursing should be marked on the
battens from eaves to ridge onto the battens with a coloured chalk line
every third or fourth tile to help maintain the perpendicular lines up
the roof. When laying the tiles, the batten gauge and the coursing lines
must be maintained and this will minimise the problems. As each tile is
laid, an assessment by the tiler should be made to ensure that each tile
fits correctly and should reject any that do not. The rejected tiles
will be used somewhere else where it is more appropriate.
Fixings
Interlocking clay tiles tend to be hung on a nib that is to the left of
the centre line such that gravity will try and rotate the tiles
clockwise to a position where the tiles are in balance about the nib.
This will happen where wind suction lifts the
tiles and drops them back into position. Each time the tile is lifted it
will rotate clockwise a bit more. Nailing each tile will help resist
some of the rotation, but will not stop all of the possible rotation.
The traditional solution was to bed the tiles in mortar to prevent the
leading edge lifting. Today this practice is frowned upon as with many
interlocking clay tiles there are now clips that will restrain the
leading edge.
However many old clay pantiles still do not
have a suitable tile clip that can be used. Some spring clips are
positively detrimental as they pull the left hand side of the tile down,
pushing the right hand side of the tile up making the gaps between the
tiles worse than ever. The solution is to choose a suitable interlocking
clay tile that has good nail holes and clip fixing systems.
General, and tips
Interlocking clay tiles require more sorting and care when setting out
and laying than interlocking concrete tiles. The results are well worth
the extra effort.
- If the pitch of the rafter is below
30º check that the tile used is suitable for the pitch.
- Never set out a roof using the gauge
and coursing figures provided by the manufacturer. They are only a
guide. The true gauge and coursing will need to be determined on
site using the actual tiles.
- Have a fixing calculation done to
determine what fixing specification should be used. This may show
that nailing the tiles is inadequate for steeper pitches and more
exposed locations.
|
| Compiled
by Chris Thomas, The Tiled Roofing Consultancy, 2 Ridlands Grove,
Limpsfield Chart, Oxted, Surrey, RH8 0ST, tel 01883 724774 |
|