 |
 |
 |
 |
 |
 |
 |
|
Check out our web directory of the UK
roofing and cladding industry
www.roofinfo.co.uk |
Sign up for our monthly news letter. |
|
|
|
 In
part one of this subject we looked at the purpose of tile clips, and
their various types, materials and constraints. In part two we will
concentrate on the fixing of the tile clips.
Fitting
Fitting most tile-to-tile clips and batten hook clips is simple as they
do not require any form of tool to fit them. Most are plastic or spring
wire and have a push-fit spring action that locks them into place. They
normally locate into the interlock first, and then are slid down the
interlock until they locate against the head of the lower tile, with one
leg under the lower tile or the timber batten. If the two tiles are not
lying in the same plane – possibly because the fascia board height is
wrong – then the clips will not fit correctly.
Batten nail clips require some form of barb or nail to
be driven into the timber batten. This is easy if you are left-handed,
but more awkward if you are right-handed, as the clip is always on the
left hand side of the tile (looking from the eaves).
Most clip nails are unsupported between the clip and the
batten; a distance that can vary from 8mm to 55mm, depending on the size
and location of the nibs. Some clip designs are L-shaped and support the
nail, making them act as a tileto- tile clip, as well as a batten nail
clip. Supporting the nail also helps to ensure the nail goes into the
centre of the batten (useful when you cannot see the batten you are
nailing into), and stops it bending under load, making the clip much
stronger.
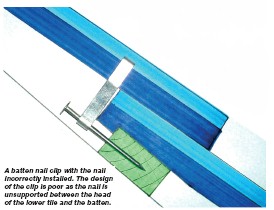
All clip nails should be driven in fully so that the head of the nail is
hard against the clip. This is often difficult to do as the nail can
bend before the head reaches the clip edge. The greater the distance the
nail head is off the clip face, and the greater the length of
unsupported nail, the weaker the tile clip fixing will be. Under load,
the clip will be pulled up the nail and out of position. The unsupported
nail will bend, allowing the clip to disengage from the side interlock.
To increase the security of some clip fixings, it is possible
to double batten and use two nail fixings to hold the clip. The second
batten should be 38mm x 38mm and be placed against the head of the lower
tile, and nailed into the rafters with 80mm-long nails. The tile should
be located into position, and the clip, which should have a horizontal
leg, should be nailed into position in the normal manner. A second nail
is then installed above the clip and into the centre of the vertical
face of the second batten to stop the clip rotating about the first nail
fixing, so holding the tile down tightly. This type of clip fixing can
be very effective for Redland Stonewold Mk II and Delta tiles, which
normally have a plastic batten hook fixing.
Instructions
Very few tile clips come with fixing instructions in the packets,
therefore fitting them comes with practice and experience.
Identification of the clips can also be difficult. |
 |
|
While some manufacturers mark the clips with
the tile model name, others have a number or letter code, which if you
are not familiar with, can make identification difficult. Some
manufacturers sell the clips separate to the nails, making the risk of
using the wrong nail even greater.
Maintenance
To check that a tile is nailed, the technique is to try and push the
tile up the roof slope (usually with one’s boot). If it does not move,
then it is likely to be nailed, but may also be clipped. If when sliding
a trowel under the leading edge of the tile and lifting the tile it will
not lift, then the tile is clipped.
It is possible to remove a tile clip by pushing the
tile below the clip up the slope (again with one’s boot). This will pull
the nail out of the batten. If the tiles are clipped with tile-to-tile
clips, a slate ripper may be needed to push the clip off the head of the
lower tile. With batten hook clips, the section that hooks into the
interlock may need to be released first.
Reinstalling the clips can be impossible or at least
very difficult. The best technique is to relocate the clip into the
batten – or onto the lower tile – and hold the interlock hook section of
the clip up with the end of a trowel, and slide the tile interlock in
under the clip, before releasing the clip. The alternative is to drill
through the leading edge of the tile, above the nail hole of the tile
below, and screw through into the batten below, ensuring that the hole
is protected with a neoprene washer and cap.
Conclusion
In sheltered locations, interlocking tiles may not need clipping;
nailing will be adequate. In most moderate locations, tiles that are
clipped will resist the anticipated winds that will occur in that
location. In severe locations, some clips will be inadequate and will
require either a more secure fixing or an alternative tile with a better
clip design.
Finding out which clips are the strongest is not easy
to discover, and often requires discussions with the tile manufacturer’s
technical staff, as this information is rarely published. Alternatively,
a full fixing specification should be obtained from the manufacturer.
Plastic clips are easy to use and easy to fit but will
never last as long as the tiles, and will become brittle, with unknown
consequences. Spring wire clips are easy to install but are unlikely to
stop tiles chattering, unless they are very tight-fitting. Identifying
clipped tiles is simple; removing and replacing them is not so easy and
is best kept to a minimum.
Tips
- Always get a fixing specification
from the tile manufacturer, and follow it.
- Always drive the nail down onto the
clip face for batten nail clips.
- Try to drive the clip nail into the
centre of the 25mm face of the batten.
- If a batten hook fixing coincides
with a rafter, find an alternative clip rather than just leaving the
clip out.
|
| Compiled
by Chris Thomas, The Tiled Roofing Consultancy, 2 Ridlands Grove,
Limpsfield Chart, Oxted, Surrey, RH8 0ST, tel 01883 724774
|
|