 |
 |
 |
 |
 |
 |
 |
|
Check out our web directory of the UK
roofing and cladding industry
www.roofinfo.co.uk |
Sign up for our monthly news letter. |
|
|
|

In part one of this subject we discussed the
design implications of roof windows. In part two we look at the
installation of roof window flashings.
Narrow cuts
The installation of the roof window is always a problem as it is
normally the carpenter who installs the window to suit the rafter
spacing and the sill/head dimensions provided by the designer to satisfy
the Building Regulations, before the roof is tiled or slated.
The size of the window is normally chosen to
accommodate a particular thermal, light, or means of escape requirement,
with no consideration for the module or setting out of the roof
covering. Consequently, the fitting of the tiles or slates around the
roof window can result in narrow cuts down the sides of the roof window,
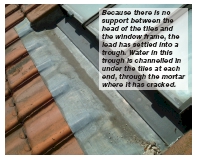
insufficient lap at the back gutter, and a trough between the bottom of
the window frame and the head of the course of tiles under the apron
flashing.
On the continent, the roof windows are normally
installed by the roofer after the roof has been tiled, or during the
roofing process, to allow the window to be positioned to suit the roof
covering, not the other way around.
Kicking up
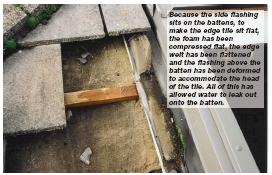
Narrow cuts at the side channels will cause problems in fixing as the
side channel flashings lay on the battens; therefore, to nail a narrow
cut to the batten often results in the nail puncturing the side
flashing. Additionally, because the side flashings lay on the battens,
it lifts the edge tile by more than the thickness of the flashings. The
head of the tile is lower than the nib position when laid, as the tiles
lay at approx 50 less than the rafter pitch, and it prevents the tile
nib from locating onto the batten, especially if the nib is continuous
across the head of the tile.
In trying to get the edge tiles to sit without
kicking up too much, the nib is often removed, the edge welt on the
flashing is flattened, making it ineffective, and the top tiles that
kick up disturb the tiles on the course that runs through above the back
gutter. The gapping that is generated between the tiles, especially
where slates or tiles are laid broken bond, can allow wind-driven rain
to get in through the gaps, beyond the edge of the flashing.
Tilt fillet and underlay
The tiles that rest on the back gutter often lay at the wrong angle as
there is often no adequate tilt fillet to support them at the correct
height. Each tile design will need a different support height to
accommodate the tile body thickness and weather-bar arrangement.
Where the tiles have to be all clipped – or clipped
around the roof window – a standard clip is impossible to fix without
penetrating the flashing/underlay. The only easy method is to use a
verge clip laid vertically and nailed to a secondary batten. The use of
a piece of tile batten laid in the back gutter to support the edge tiles
or slates is unsatisfactory, as the timber will get wet and rot away
prematurely, or slide out. |
 |
There is a requirement to turn the underlay
up the sides of the roof window by approx 50mm to ensure any water on
the underlay does not leak in under the window frame. Unfortunately, at
the corners (unless the side pieces of underlay are separate from those
above, and below the roof window) there will be holes in the underlay at
each corner. The common practice is to mitre cut the underlay at the
corners to let it turn up, leaving a V shaped hole at the corner that
can let water drain in.
Leaks at the corners would indicate that there are
problems with the flashings around the window or higher up, as without
the water draining through the hole on the corner, the underlay would
act for many years as the primary waterproofing layer and rot through
long after the guarantee on the roof window had run out.
Some companies provide a gasket that is
laid over the battens before the flashings are fitted, which lifts up
the side flashing by the thickness of the gasket. The gasket sticks to
the battens and underlay, to protect the four corners of the roof window
and disguise the fact that there is any water leaking onto the underlay
through the tiles or flashings.
Debris traps
Around the roof window flashings, there are potential traps where
leaves, pine needles, moss, snow and other natural debris can collect
and prevent rainwater getting away, leaving a problem, especially with
windows installed in shallow pitched roofs. The heavy metal roof
windows, with plate hinges and bolts that extend into the back gutter,
can collect debris between the two hinges.
At the bottom of the side channels, the
flashing has to change pitch to rise up onto the top surface of the
tiles in the course below the roof window. Where this change of pitch
occurs, it forms a dip that allows debris to collect and obstruct the
water flowing down the side channels.
A shallow trough can occur where the apron
flashing spans from the frame to the top of the tiles in the course
below the window. This can collect debris and channel water sideways
under the tiles on the first course on either side of the window and
onto the underlay.
In conclusion
Roof window installations with proprietary flashings are an easy fixing
option. They are a Jack-of-all-trades and often a master of none.
Purpose-made lead flashings, correctly installed, to the correct width
and laps, would be a much better option for most situations, but would
be more work and less convenient. In many instances, the roof windows
are excellent, but are let down by the poor performance of the integral
or removable flashings.
Tips
- Do not cut the underlay at the
corners of the window frame, but use separate pieces lapped onto the
one below.
- Try and choose a window sized and
positioned to suit the module of the tiles or slates, to eliminate
all narrow cuts.
- Use verge clips to secure edge tiles
where the normal fixing would penetrate the flashing and compromise
the weather resistance.
|
| Compiled
by Chris Thomas, The Tiled Roofing Consultancy, 2 Ridlands Grove,
Limpsfield Chart, Oxted, Surrey, RH8 0ST, tel 01883 724774 |
|