 |
 |
 |
 |
 |
 |
 |
|
Check out our web directory of the UK
roofing and cladding industry
www.roofinfo.co.uk |
Sign up for our monthly news letter. |
|
|
|

Ridge construction part 2 looks at the roof
structure and the installation of the ridge tiles, with special
reference to mortar bedding.
Roof structure
With a traditional cut timber roof the apex of the roof
structure is a ridge board against which each timber rafter is set and
fixed. The rafters on one roof slope should line up with the rafters on
the adjacent roof slope. The width and height of the ridge board will
vary from roof to roof. With a trussed rafter roof there is no ridge
board and the rafters are mitred together at a point making it easier to
position the top batten closer to the apex than with a traditional cut
roof. With liner trays or composite panels the metal panels are
generally cut square, leaving a large V gap at the apex. Often the ribs
and corrugations on one slope do not line up with the ribs and
corrugations on the adjacent roof slope. If counter battens are used on
the liner trays they can be extended to the apex and mitred to the
counter batten on the adjacent roof slope, provided the ribs line up,
otherwise a ridge board will need to be installed. Alternatively with no
counter battens an inverted V-shaped metal trim has to be installed to
create an apex onto which the top tile or slate battens can be screwed
to get them as close to the apex as possible. The variations in roof
structure can make a big difference to the choice of roof space
ventilation and end ridge fixing method.
Ridge fixings
For fixing end ridge tiles, where the wind uplift is
high, and with dry fixed ridge systems, it is essential to have a semi
structural ridge timber/batten at the apex of the roof to provide a
suitable ground for the ridge tile screw fixings to fix into. Where the
roof structure is a traditional cut timber roof, provided the ridge
board is wide enough and the screw fixings are long enough, it is
possible to fix directly into the ridge beard. However, it is often
better to locate a timber tile batten above the ridge board and secure
it to the ridge board or rafters with straps to provide a wider timber
to fix into and allow a shorter screw to be used. With trussed rafters
there is no ridge board, so a suitably sized ridge batten needs to be
strapped down to each rafter. Due to the mitre joint at the apex of a
trussed rafter roof it is not sensible to fix the ridge batten directly
into the apex of a rafter unit with nails or screws. With liner-trays
and composite panels with a metal V trim at the apex, screwing the
timber ridge batten into the trim may be a problem, unless it is
installed from the underside before the V trim is installed. For more
information on end ridge fixings see Tiling Tips 12.
Mortar bedding
The ridge tiles are installed after the underlay, tile
battens, ridge batten and tiles/slates. If a dry fix system is being
used then the installation instructions should be followed. For
mortar-bedded ridges the first problem to overcome is access.
The generally accepted method is to sit on the ridge line
with one leg/knee on each roof slope with your back to the direction of
travel, which should be into the prevailing wind, or standing on a roof
ladder hooked over the ridge. You will need the ridge tiles, a bucket of
mortar, the end ridge fixings and the tools to do the job. First you
should wet out the underside of the ridge tiles and the top surface of
the tiles/slates, followed by lining out a row of ridge tiles in their
final position and marking with the tip of a trowel the edge line on
both sides, and the location of each cross bed joint.
The mortar should be a 1:3 cement sand mortar mix with
sufficient water to allow the mortar to stand up at least 75mm without
slumping. If the tiles are all to be mechanically fixed the sand can be
soft sand as used by brick layers in brick mortar. But if the ridge
tiles are not mechanically fixed the sand should be a 50/50 mix of soft
sand and screeding sand (sharp sand) to produce a mortar mix that is
similar to the mix that is used to make concrete roof tiles. The
addition of pigment should be done before or when the water is added to
the mix to ensure it is thoroughly mixed. |
 |
The use of additives should be avoided or
used sparingly to achieve the best adhesion with the ridge and roof
tiles/slates.
A continuous line of mortar should be placed adjacent
to the edge lines marked on the surface of the tile. The width of the
bed should be approx 50mm, and the height will depend upon the shape of
the ridge tile, the roof tiles, and the pitch of the roof. When
the ridge tile is positioned on the mortar and levelled into the mortar,
the surface contact on the underside of the ridge should be at least
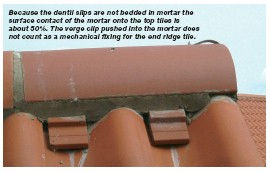
50mm.Where the depth of a tile corrugation is greater than 25mm, dentil
slips should be used to thin out the thickness of the fresh mortar.
Dentil slips should always have a bed of mortar under them to ensure
there is adhesion between the dentil slip and the top surface of the top
tile, also to even out the thickness of the mortar above and below the
dentil slip. The cross bed joints should be a minimum of 100mm wide and
set on a piece of tile or slate that bridges the top tiles/slates to
prevent the mortar coming into contact with either the ridge batten or
falling onto the underlay. If the height of the cross bed mortar is
greater than 25mm, pieces of tile should be used to thin out the fresh
mortar to bring it up to a suitable height.
When the ridge tile is laid into the fresh mortar it
should have a 50mm bed along each edge and side. It is not acceptable to
place mortar under the cross bed joint after the ridge has been laid as
a full 50mm of surface contact is not possible to achieve. Once three or
four ridge tiles have been laid it is best to level up the ridge tiles
and tap them down to achieve compaction between the ridge tiles and the
mortar without causing the mortar to slump away from the underside of
the ridge tile. If you do not tap the ridge tiles down there will be no
compaction of the mortar with the underside of the ridge, and the mortar
bond will not be complete. Any excess mortar should be trowelled off and
reused further along the ridge line. This process should continue to the
end of the ridge line, with the minimum disturbance to the top course of
tiles/slates. In hot weather if the mortar is drying too quickly,
sacking or wet carpet should be used to keep the chemical reaction of
the cement going to achieve the best possible mortar bond. Before the
mortar has gone off, the surface of the mortar should be trowelled up to
a smooth finish without disturbing the tiles or the ridges. Any excess
mortar should be removed with care to prevent smearing of the tile/slate
surface.
If the weather changes and rain threatens to wash the
surface of the mortar away, again sacking or old carpet should be used
to prevent cement washing down the surface of the roof. If cement
staining does occur, brick cleaner should be used to wash off the cement
marks after the rain has stopped. Once the mortar bedding has gone off
it is possible to install the screw fixings into the ridge batten/board
to the end and any other ridge tiles, ensuring that the screws are not
over-tightened.
Tips
- Install any ridge battens before
installing the top tile/slate battens.
- Remember to place mortar into the
pan of the tile before dentil slips are installed.
- After the ridge tiles have been
levelled, and the mortar trowelled up, do not let the mortar dry out
too quickly or disturb it by walking on the top tiles.
Ridge construction part 3 will deal with
accessories and fittings. |
| Compiled
by Chris Thomas, The Tiled Roofing Consultancy, 2 Ridlands Grove,
Limpsfield Chart, Oxted, Surrey, RH8 0ST, tel 01883 724774 |
|