 |
 |
 |
 |
 |
 |
 |
|
Check out our web directory of the UK
roofing and cladding industry
www.roofinfo.co.uk |
Sign up for our monthly news letter. |
|
|
|

There is a notion that pitched roofs look
more romantic if the plain tiles sweep gently from one roof slope to
another, without the interruption of a sharp corner or a break in the
construction, just like a thatched roof.
Swept valleys are fairly rare, require a lot of tile cutting,
and can be costly to construct. Therefore, understanding their
advantages and disadvantages before specifying or constructing a roof
incorporating a swept valley is essential.
Swept valley
A swept valley is a valley formed of tapered tiles nailed to a
support board that bridges the junction of two roof slopes at an
inclined valley. Each horizontal tile course is maintained and no
special valley tiles are needed. The design of a swept valley is
traditional with stone slates, and to some extent natural slates.
Forming a swept valley with plain tiles is almost impossible to achieve
and comply with British Standards 8000 Part 6 and 5534.
For a swept valley to work the rafter pitches on both sides
of the valley must be the same (ideally steeper than 40°). It also works
best if there are two swept valleys that meet at a ridge that is part
way up a main roof slope, such as a dormer. In this situation the curve
is run up and lost into the roof slope above. The actual junction is
covered by the ridge tiles that are turned up the roof and also lost
into the roof slope. If the valley is not part of a matched pair, the
valley will meet a square ridge junction. This will leave a curved
exposed section that will need a large curved lead saddle to cover up
the difference between the two.
Support boards
Three boards need to be installed to ensure that the tiles form a
curve around the valley. The underlay should be installed in the normal
manner with a 225mm wide timber (not ply) board laid straight down the
centre of the valley. Preferably this will be the same thickness as the
tile battens, and nailed into each rafter. The width of the board can
vary slightly depending upon the rafter pitch. The other two boards
should be feather edge boards at least 100mm wide (fence pales) fixed
down the sides of the centre board with the thinnest edge facing the
centre line. These should be positioned to halve the angle between the
rafters and the first support board, and should be nailed to the support
board.
With the adjacent roof slopes, the support boards should form
five surfaces onto which the tiles can be nailed. The tile battens on
each roof slope should be cut against the thick edge of the feather edge
boards to finish flush with the top surface and to align horizontally
with the battens on the adjacent roof slope. None of the battens are cut
around the curve.
Eaves & guage
As the swept valley forms a curve (most eaves fascia boards or open
rafters meet at a sharp right angle at the bottom of the valley) the
under eaves course of tiles needs to be set to meet at a mitre parallel
with the fascia board. The first full course of tiles should be set in
the curve as for the rest of the valley. However, some people like to
keep this course parallel with the fascia, mitre it with a soaker, and
form the curve of the valley on the second full course of tiles. Either
is acceptable.
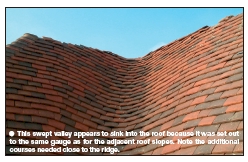
The distance up the centre line of a valley will be longer
than the distance up the rafter for the same vertical rise. To achieve
the same number of tile courses around the curve of the valley, the
gauge of the tiles on the centre line of the valley will be greater than
for the tiles on the adjacent roof slope. |
 |
This means that either the whole roof must
be set out at the minimum gauge of 88mm, such that the tiles on the
centre-line of the valley do not exceed 100mm gauge, or if the roof is
set out at 100mm gauge, the tiles on the centre line of the valley will
have a gauge of more than 100mm. The closer to vertical the rafter pitch
is, the smaller the difference in gauge. The difference in gauge will
depend upon the rafter pitch. Unless the rafter pitch is steeper than
59° it will be impossible to keep within the 88mm-100mm gauge parameters
and the maximum and minimum head-lap requirements of BS5534, without
resorting to other means.
One means of overcoming the problem is to lay sheet lead
soakers, or other similar material, between each tile course around the
valley. The gauge increasing is not a problem with stone or natural
slates as longer slates can be used up the valley to maintain the
required headlap for the true pitch.
Side lap
As the tiles progress around the valley on each course from
one roof slope to the other, the tiles must be cut to a taper to fit.
Tapering the tiles makes the tiles at the leading edge narrower and the
perp joints should be maintained on the curve and lost in the adjacent
roof slope. Each tile joint on the curve should fall in the centre of
the tile below to give the maximum side lap with the joint on the course
below. This is best achieved by setting out the valley from the centre
line and working out onto each adjacent roof slope. BS5534 requires a
minimum side lap of 55mm.
As the tiles are cut to a taper and work progresses up the
roof, the side lap will increase to the point where a tile is not wide
enough and a tile-and-a half is needed. When it is possible, two tiles
should be cut to finish on the tile-and-a-half. The resulting cuts will
mean that many of the side laps will be less than 55mm. Laying courses
of sheet lead soakers or similar material between each course of tiles
around the valley will protect the lack of adequate side lap. This is
not a problem with slates as wider slates can be used around the valley.
As there are no battens around the curve of the valley, the
tile nibs need to be removed were they in contact with the support
boards. Each tile that has been cut to a taper needs to be nailed twice
to the support board. If the nail hole has been cut off, it should be
re-drilled as two nail fixings are essential. One central nail fixing
would coincide with the joint of the tiles above and be prone to
leaking.
Tips
- Swept valleys may look good if done
correctly but will not comply with British Standards, unless large
soakers between each course of tiles are used.
- The fixing of the support boards and
the maintaining of the horizontal line around the curve is critical.
- Down the centre line of the valley the
gauge of the tiles will be in excess of the tiles on the main roof
slope. Never maintain the same gauge around the valley as this will
generate additional tile courses and look strange.
- Unless the side lap exceeds 55mm, a
large soaker between each tile course will be needed.
|
| Compiled
by Chris Thomas, The Tiled Roofing Consultancy, 2 Ridlands Grove,
Limpsfield Chart, Oxted, Surrey, RH8 0ST, tel 01883 724774 |
|