
Thatched roofs - with their curved detailing at the perimeters,
over dormer windows and around turrets - look graceful. Achieving the
same result with roof tiles or slate is far from simple.
Tiles and slates
In the past specially designed interlocking tiles were suitable for
use on a curved roof, such as a Redland Statesman. However, installation
of roof tiles on a curved roof, like a cone, should only be undertaken
using a double lap tile or slate. The choice between a plain tile, and
double slate, will depend upon the pitch of the roof and the roof
covering used on the rest of the building.
As plain tiles come in only one size, there
will be a lot of cutting on site, which is very labour-intensive. For
steep pitches it is possible to get Oast House tiles, eliminating most
of the need for site-cutting each tile, but they are not suitable for
shallower pitches. Slates are available in various sizes, so it is
possible to be selective and reduce wastage on site.
The principles for forming a curve in slates or
tiles are similar, apart for some different fixing arrangements.
Centre-nailed double lap slates are more secure when twice-nailed than
headnailed plain tiles. But a slate that is flat in both directions
tends to rest on its middle on an external curve (on plan). Therefore,
nailing the slate down at the edges can cause the slate to tilt or break
if nailed down too far on one side. Oast House and plain tiles with a
camber in their width are better able to cope with a curved shape on
plan. Where the curve is at right angles to the eaves (in section) a
plain tile with a camber in its length is also more capable of coping
with the curve than a flat slate, which will either kick up on an
outward curve or be unsupported in the middle on an inward curve -
making it easier to break.
Underlay and battens
With both slates and tiles, the underlay and battening of a curved
roof on plan is not simple - neither the underlay nor the battens want
to run in a horizontal plane because the distance around the curve
towards the ridge is different to the distance around the curve close to
the eaves. Therefore, a roll of underlay will want to unroll in a
downward curve. While timber battens want to do the same thing, they can
be bent around the curve and nailed in a horizontal plane.
For this reason it is best to start laying
underlay uphill and to start nailing a batten at its centre and bend the
batten around the curve in both directions. As the radius gets smaller
it will be found that it is impossible to bend the battens around the
curve and other methods will be needed such as soaking, steaming or
laminating the battens, none of which is approved by BS5534, the Code of
Practice for slating and tiling.
Setting out
The setting out of the curved section of roof needs to be started at
the centre and worked away towards a fixed feature such as a side
abutment or a verge. It is best to set out the eaves' course of
tiles/slates around an external curve, and around the ridge on an
internal curve, using the largest width of slates or whole plain tiles.
Using a chalk line attached to the apex of the external curve, or the
theoretical base of an internal curve, strike chalk lines down the
battens for each tile/slate joint as a guide to cutting each and every
tile/slate. This will ensure straight perpendicular joints up the roof.
Every tile/slate on the curved section of roof will need to be cut. The
amount of taper in the length of each tile/slate will depend upon the
rafter pitch, while the width along the leading edge will vary with
every course.
Side lap
As work proceeds up the cone, the tiles/slates will become narrower
and narrower. This will reduce both the side lap and the position of
nail holes, which will have to be re-drilled, punched or cut into the
tile/slate. On shallow pitch roofs there will be a point where the
distance from the side lap of the course of slates above will become too
close to the nail holes to prevent water from seeping sideways under the
slates and down the nail hole.
|
 |
|
Therefore, keep the pitch of curved roofs as
steep as possible. With both plain tiles and slate there comes a point
where the side lap will fall below the minimum recommended. For plain
tiles the minimum side lap is 55mm and with slates it will vary with
rafter pitch and rain exposure category. At this point a layer of waterproofing
material, such as code three lead sheet (200mm wide for plain tiles,
possibly wider for slate), will need to be installed between the courses
of tiles/slates as a continuous soaker to prevent side lap leakage. It
will be necessary to continue to reduce the width of the tiles/slates to
maintain the perpendicular joints. When the leading edge of
plain tiles reaches 82mm, it is possible to start again with whole-width
tiles. The same could be done with slates, depending upon the width of
the widest slates being used. The only problem with reverting to
full-width tile/slates is the course of tiles/slates will kick out
relative to the course below and will be clearly visible as being
different.
Fixings
Every tile or slate on a curved roof must be twice-nailed as they
are less secure than on a conventional section of roof. When the head of
the tile or slate gets too narrow it may be better to screw fix with one
large screw rather than two nails, so as not to weaken it at this point.
With fibre cement slates the hole for the copper disc rivet may need to
be re punched if the perpendicular joints drift. Another good method for
fixing natural slates on a curve is hook fixing.
Flashings
Close to the apex it will be impossible to fix the small pieces of
tile or slate as the taper cut will reduce the length of the tile/slate.
At this point the tiling/slating will have to stop and a lead cap or
flashing be installed. This point should be possible to determine from
the chalk lines marked on the battens and will vary with rafter
pitch.
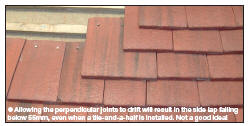
Joint drift
One method of tiling a curved roof which is not recommended is to use
full width tiles and allow the perpendicular joints to drift from course
to course. This will result in some side laps falling below 55mm on
every course above eaves level. When this occurs it is tempting to
install a tile-and-a-half to make up the lost half bond. Once a
tile-and-a-half is installed, one tile-and-a-half will need to be
installed on every course above that point to maintain the side lap
bond. While at low level this may work, at high level where the radius
is smaller the wider tile will kick out and upset the laying of the
adjacent tiles. The only place a tile-and-a-half should be used is at
the vertical perimeters of a plain tile roof, not in the middle.
Completion
A curved roof will contravene some British Standards, and/or the
tile/slate manufacturer's recommendations, and any guarantee for the
tiles or slates is likely to be null and void. Therefore, any failure of
the curved roof will be the responsibility of the contractor/specifier,
depending upon what the failure is.
Tips
- keep the pitch of the curved section
as steep as possible
- use a double-lap product such as plain
tiles or slates to cover a roof that is curved on plan
- every tile and slate will need to be
cut to fit and must be fully nailed or screwed to the battens
- when the side lap falls below the
minimum for the tiles or slates, courses of waterproofing material
such as code three lead sheet should be installed
- avoid letting perpendicular joints
drift and using a tile/slate-and-a-half to correct it
|