In the previous article (Part 1) we
looked at the requirements of the roof structure and the battening prior
to the laying of plain tile hips on the roof. In this article we will be
looking at the process of laying the tiles themselves.
Sorting
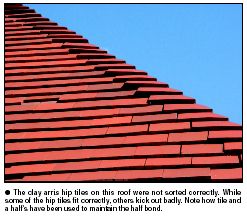
The first process in this phase of the work is for the clay hip
tiles to be sorted. This is especially important with clay arris hip
tiles, as one surface can bow during firing due to the way the tiles are
stacked in the kiln. Only one side of the hip tile rests on the floor of
the kiln car, while the other is free to move during the molten stage of
the firing process. By sorting similar tiles together they can be laid
up different hip lines to give an even appearance. Where there is a
sprocket flatter hip tiles can be used. Those that are too flat or bent
upwards should be rejected as unusable. It is better to have a hip tile
with a smaller dihedral angle than required, as the tile will dig into
the roof. A hip tile with a larger dihedral angle than required will
kick out leaving a gap, lifting the tile above and looking
'wrong'.
Mortar bedding
When laying the hip tiles the mortar bedding should be undertaken as the
work proceeds. For bonnet hip tiles this means placing a 50mm wide bed
of mortar along the line of the leading edge of the hip tile above,
while with arris hip tiles the mortar bedding should be placed just in
front of the nail hole. The smaller the gap between the hip tiles the
less it will kick the tiles up and the more side lap will be achieved
with the adjacent tiles. If the thickness of the mortar bedding is
excessive, the top surface of the hip tile can fall back in towards the
hip rafter - not a good idea.
Side laps
The hip tiles should provide a side lap of 55mm but this will vary
with gauge. The tiles adjacent to the hip tiles will need to be cut to
form a neat fit with the hip tile. As work proceeds up the hip the width
of the tile adjacent to the hip tile will become wider to maintain the
half bond with the rest of the roof. In this instance a tile and a half
should be cut to fit. In some instances two cut tile and a half's are
needed to avoid creating a side lap of less than 55mm with the adjacent
tiling.
Fixing
Each hip tile needs to be nailed into the hip rafter, or a hip
batten greater than 25mm thick. A hip batten must also be adequately
nailed to the hip rafter for it to be of any structural use. The nails
holding the bonnet hip tiles into a hip rafter can be very long as the
distance down to the hip rafter can be as much as 75mm plus the 25mm of
nail penetration.
|