|

Soakers, in the context of slates and tiles
on pitched roofs, are metal or plastic flashings that are installed
between each course of plain tiles and double lap slates, to weather the
junction between a roof slope and an upstand that is parallel with a
rafter, such as a wall or roof window at a side abutment, at a party
wall junction, between two roof slopes at a valley or a hip, or in a
line of slates or tiles on a curved roof or swept valley, where side lap
joints are too close on consecutive courses. For each of these
situations the shape and size of the soaker can be slightly different.
Materials
Soakers are traditionally made from code 3 lead sheet (1.3mm thick) but
could equally be made from code 4 lead sheet (1.8mm thick) but should
not be thicker, as the thicker the material the more the soaker will
affect how the tiles and slates lay in an array. It is possible that
soakers could be made from aluminium sheet (min. 0.7mm thick), zinc
sheet (min. 0.8mm thick), or copper sheet (min. 0.55mm thick), but none
of these metals are as easy to bend or stretch into shape as lead.
In most instances the thinness of the metal allows them
to be bent reasonably easily, provided the grade of material does not
crack once bent. In most instances aluminium and zinc soakers are
supplied pre-cut and bent to save time on site.
The plastic or GRP pre-formed soakers can often be
thicker than the metal equivalent and are easy to install in certain
instances, but are not as adaptable in all situations. In terms of
length of service, lead should last the longest with copper second,
plastic will come last.
It is essential that the soakers are fully
supported, especially with lead, as the soakers will not support their
own weight and will deform down into any gap they have to span.
Shape
Most people think of soakers as being L shaped in section, being a
square of metal bent parallel to one edge. This is almost true for side
abutment situations, but for hips and valleys they are more delta and
kite shaped, and for curved tiling may be long curved strips. The shape
will vary depending upon the situation and the rafter pitch.
Fixings
Traditionally the top edge of the soaker is turned down at right angles
by approx 25mm to form a continuous nib that hooks onto the top edge of
the plain tile, or the slate batten. To save 25mm of material some
slaters will nail the soaker to the slate batten with two copper nails,
saving the turn down, but this is not possible with plain tiles, as
there is no batten to nail into.
Side abutments/party wall junction
The width of a soaker at a side abutment is the sum of the vertical
upstand of at least 75mm, plus the horizontal cover width of 100mm
(minimum total 175mm). If the tiles/slates do not abut the wall, or roof
window, tightly, the horizontal cover width should be increased to
ensure that there is 100mm of soaker between the slates and tiles.
The exposed vertical edge of the soaker should be
protected with a cover flashing which is turned into a wall or other
feature, to protect it. Where a raking side abutment results in water
flowing towards the abutment, the side lap should be treated as half a
valley.
At a party wall junction with a timber core roll
running up the party wall line, the vertical leg of each soaker needs to
be at least 125mm to ensure that the soaker can be dressed over the
timber core roll and nailed in place, before it is covered with a
capping. The length of the soaker should be the sum of the head lap plus
the gauge, plus the 25mm turn down.
For plain tiles this will be not less than 175mm for
vertical tiling, and 190-200mm for pitched roofs, depending upon the
head lap. For slates the formula is very similar, plus 25mm for the half
width of batten. Therefore for slates laid at 100mm head lap, 400mm long
slates will need a soaker 300mm long, for 500mm long slates 350mm long,
and for 600mm long slates 400mm long. If the soakers are head nailed
they can be reduced by 25mm.
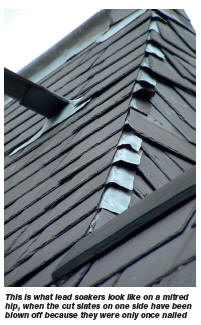
Hips
At a mitred hip, water will run away from the hip line, therefore very
little water should get onto the soaker, so, as with a side abutment,
the horizontal side lap only needs to be 100mm at 35º and above and for
slates below 35º, 150mm. Note the lap dimension on either side of the
centreline of the hip mitre is measured not at right angles to the hip
line but horizontal (along the batten).
Because the top and bottom edges of the tiles/slates run away from the
centre line at an angle, the resulting soaker is delta shaped and bent
down the centreline to fit the angle of the hip. |
 |
|
The rafter pitch will affect the length of
the flashing as well as the head lap of the slate, or tiles, so it is
best to make a cardboard template laid on the actual tiles/slates before
cutting the soaker to avoid a lot of waste.
Valleys
A valley is in effect the opposite of a hip, therefore mitred valley
soakers are almost an upsidedown hip soaker with the 25mm down turn at
the opposite end. Because water runs towards a valley and a lot of water
will find its way down the mitre joint, the horizontal side lap needs to
be at least 150mm for rafter pitches of 45º and above, where the valley
meets at 90º plan angle.
If the plan angle between the roof slopes is greater than 90º
the true valley pitch increases; if the plan angle is less than 90º then
the true valley pitch gets shallower and may require an adjustment to
the side lap.
At below 45º valley soakers should not be used with
plain tiles but with slates the soaker should be kite shaped and be the
full length of the slate plus 50mm, and both the top edges should be the
width of one slate from the centre line of the valley.
In all instances if the valley is longer than 6m,
soakers under mitred valleys are not recommended, as the volumes of
water at the bottom of the valley can be too great for the soakers to
cope with.
Curved roofs
Often where tiles or slates are laid on an internal or external curve,
such as a turret or a swept valley, the tiles/slates are cut to a taper,
and the side lap can either drift close to coinciding on consecutive
courses, or becoming too small to keep water from running sideways
through the double lap system. Where the side lap on plain tiles falls
below 55mm side lap continuous soakers should be installed.
With slates, the side lap dimension needs to be
calculated dependent upon the width of the slate, the position of the
nail holes, the pitch of the slates, and the driving rain index relative
to the location of the building. The width of the soaker will vary, the
tighter the radius the more the soaker will curve. The length of the
soaker will be the same as for a side abutment.
Conclusion
Metal soakers are an effective way of weathering the vertical and
inclined edge junctions of double lap tiles and slates, but should never
be used with interlocking tiles or slates.
Where water runs away from the soaker the side lap needs to
be a minimum of 100mm, and where water runs towards the soakers, such as
a valley, the side lap should be a minimum of 150mm, and greater at
rafter pitches below 45º.
Tips
- Make a cardboard template before you
cut any metal to make a soaker.
- Plain tiles are cambered and
therefore the soaker needs to be dressed to follow the shape of the
tile.
- Always try and finish the lower edge
of the soaker flush with the leading edge of the tile or slate
course to give the full cover protection.
|