 |
 |
 |
 |
 |
 |
 |
|
Check out our web directory of the UK
roofing and cladding industry
www.roofinfo.co.uk |
Sign up for our monthly news letter. |
|
|
|
|

With the latest architectural trend of every
new building having at least one curved surface or a curved roofing
feature; the integration of semicircular cones into a roof with straight
pitches will present a problem, which is usually solved by introducing a
valley. But with any curved roof the resulting valley will also be
curved. So why is this different to a straight valley?
Geometry
Where a straight plane meets a semicircular plane at any angle that is
not an extension (tangent) to the radius, the change of direction is
likely to form a valley towards which water will run. The resulting
alignment of that valley will inevitably be curved, especially if the
pitches of the roof slopes are different.
Even if the pitch is the same, and the two roofs
intersect at the eaves at right angles, as the valley rises away from
the eaves, the angle at which the two roof slopes meet will change by a
few degrees.
Also, the curvature of the valley will result in the
true valley pitch becoming shallower, and as it approaches the ridge, or
the back of the semi-circle roof section, it could become horizontal.
This means that the curved valley will be constantly changing and so
will the relationship of the tiles on either side of the valley.
Tiles and slates
The curved roof will be clad with either double lap tiles either plain
tiles or unders and overs, or double lap slates, either natural or fibre
cement, as there are few interlocking tiles that can be laid on a
semi-circular cone. This may mean that the adjacent straight roof slopes
will be clad in the same roof covering.
It is possible that the straight roof slope may
have an interlocking tile or slate roof covering, and this is more
reason why a correctly formed valley between the two roof slopes is
needed.
With plain tiles there is only one size, but with
slates it would be best to use a large size slate at the eaves and
diminish the width of the slates around the curved section finishing
with small cuts at the apex.
Regardless of the tiles or slates being used, even if
the batten gauge on each slope is maintained, the coursing at the valley
will run out as the valley curves up towards the ridge. Therefore it is
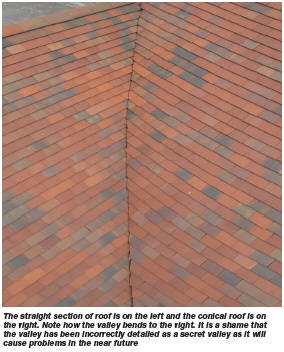
not possible to form a mitred, tiled, swept or laced valley.
It may be tempting to form a secret, or closed valley,
but that is also not recommended, as it will cause problems at a later
date when debris has been washed into the valley and it blocks the
drainage channel, causing flooding under the tiles or slates.
The best solution is an open valley. This will have to
be formed in metal (lead) as it is not possible to obtain a curved GRP
valley trough, or to bend one to a curve.
Valley construction
The construction of the lead valley in cross section will be similar to
that of a straight valley with the width of the open channel being
determined by the rafter pitch, the roof area and the rainfall rate.
|
 |
On the outer edges there should be a welt
and a tilt fillet as normal. But with a curved valley, water will tend
to run to the outside of the curve and therefore, to prevent the water
washing in under the slates or tiles, either the slates or tiles need to
be mortar bedded onto a slate or undercloak strip, or a second tilt
fillet should be formed just under the cut edge of the slates on the
external radius of the valley. This will form a third line of defence
against torrential rain discharging down the valley.
The sections of lead sheet should all be 1.5m long and
wide enough to be dressed over the full width of the construction,
meaning the lead is likely to be at least 600mm wide before being
dressed to a curve. As the valley rises, the true pitch will reduce,
requiring more head lap. But also, as the true pitch of the valley
reduces, the width of the valley may also need to be increased,
especially if there is a large area of roof draining into the curved
valley at that point.
Where the valley curves to below 11º true pitch, a
conventional lapped sheet construction will not be acceptable and either
an alternative material will be needed, or steps and rolls may be
needed. Do not consider doing the valley in one long piece with no lap
joints, as the lead will tear itself apart.
All of the support boards should be fitted
between the rafters as, again, forming a curved support board will be
difficult. Every cut tile or slate on both sides of the valley will be
different and care should be taken to keep the line as work progresses
up the valley.
Conclusion
The important thing to remember is that only an open metal valley is
suitable for a curved valley between a curved roof and a straight roof
and that the construction may be fairly conventional. Without mortar
bedding an additional tilt fillet will be needed.
Like all curved roofs there is a lot of cutting to be
undertaken to maintain the curve in both directions, both around the
curve and down the sides of the valley.
Tips
- Install the valley boards between
the rafters, not above.
- Do not attempt to course around from
the curved roof slope onto the straight roof slope at a valley
between the two.
- Start and finish the valley at eaves
and ridge as normal.
|
| Compiled
by Chris Thomas, The Tiled Roofing Consultancy, 2 Ridlands Grove,
Limpsfield Chart, Oxted, Surrey, RH8 0ST, tel 01883 724774 |
|