 |
 |
 |
 |
 |
 |
 |
|
Check out our web directory of the UK
roofing and cladding industry
www.roofinfo.co.uk |
Sign up for our monthly news letter. |
|
|
|
|

In the roofing industry we all know about metal flashings,
especially lead sheet flashings. They have been with us since what feels
like the beginning of time, but only became common during the 20th
century. We all know that down to a true pitch of 30º the vertical lap
of lead sheet over any surface should be no less than 150mm, and as the
true pitch drops so the length of the vertical lap increases. But what
most people forget is that the horizontal lap also needs to increase as
the true pitch drops below 22.5º.
Horizontal laps
In most situations, such as a top edge abutment, a flashing will lap
onto the surface of the tiles by at least 150mm (depending upon the true
pitch, which is less than the rafter pitch), bridge across to the
abutment upstand, rise up the vertical face by at least 75mm, and either
tuck into brick joint, or be head nailed and lapped by a cover flashing
or another material, like vertical plain tiles or rendering. In this
situation the flashing changes pitch as it rises from the tiles to the
head nail fixing. But with some flashings one or more of the sections of
the flashing can be at a lower true pitch than the rest and it is the
true pitch of the lowest section of the flashing that should determine
the actual horizontal lap that is used.
If we were to take a chimney back gutter that is more than 2m
wide, using Code 4 lead the back gutter should be made in two pieces.
The joint between the two sections should not be lapped as the sole of
the back gutter is horizontal and therefore the joint should be a lead
covered timber core roll a lead roll. This will ensure the joint is
weathered and the lead can expand and contract without cracking.
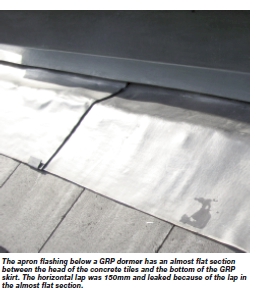
But there are instances where flashings can be almost
horizontal and are regularly installed with a 150mm horizontal lap,
which is incorrect as no lap joint should be formed below 11º. As an
example, the flashing at the change of rafter pitch on a mansard roof
may require the flashing on the steep lower slope to be 100mm horizontal
lap, but where the flashing passes under the tiles or slates on the
shallow upper roof slope the pitch of the flashing will quite often fall
below 11º and can be horizontal.
As we have seen with the chimney back gutter, below 11º
the flashing should not be lapped but formed in some other way. With a
mansard it would be inappropriate to use a lead covered timber core roll
joint. It may be tempting to run a very long length of lead flashing, or
weld sections of lead flashing together, so that there are no laps; this
should never be done as it will severely restrict the thermal movement
of the lead sheet, and it will prematurely crack. What is needed is a
welted joint.
Recommendations
The recommendations of the Lead Sheet Association are as follows:
Joints between flashings are usually laps. With
abutment flashings, the side laps should be not less than 100mm
increasing to 150mm for locations that are exposed to high wind and
rain. Flashings over 200mm girth will require a side lap of at least
200mm with the lap clipped. |
 |
Where it states high wind and rain, this is
defined in BS 5534 as equal to, or more than, 56.5 litres of driving
rain per metre square, per spell, which is two minutes.
Where it mentions 200mm girth, this refers not to the
total width of the lead sheet but the lap of the flashing over the
surface below (head lap). This means that as soon as the true pitch of
the tiles or slates at an abutment drops below 22.5º (normally about
27.5º rafter pitch) the horizontal lap needs to increase to at least
200mm, and for the same pitch in an exposed location 250mm.
Whilst it would be logical to increase the horizontal
lap at the same rate as the vertical lap increases as the rafter pitch
drops down towards 11º, experience would suggest otherwise. This also
means that at true pitches below 11º the lead flashing should not be
lapped horizontally, and rolls, or welted seams should be used instead.
Conclusion
When installing a lead flashing, determine the horizontal lap by
measuring the true pitch of the lowest pitch of any section of the
flashing, and if below 11º, either raise that section, or use some other
jointing system between the sections of flashing. Between vertical and
22.5º true vertical pitch 100mm or 150mm horizontal lap (depending upon
the driving rain exposure of the roof) should be used, and between 11º
and 22.5º true vertical pitch the horizontal lap should be 200mm or
250mm depending upon the exposure of the roof.
Tips
- Where flashings lap under tiles, or
other sections of flashing, the horizontal lap requirements between
sections of flashings still applies.
- Lead sheet should be fully
supported. Be careful that there is not an unsupported gap between
the head of a tile, or slate, and the vertical upstand at an
abutment, where the flashing can develop into a trough.
- All horizontal laps should be lapped
away from the prevailing wind direction and should always be clipped
|
| Compiled
by Chris Thomas, The Tiled Roofing Consultancy, 2 Ridlands Grove,
Limpsfield Chart, Oxted, Surrey, RH8 0ST, tel 01883 724774 |
|