 |
 |
 |
 |
 |
 |
 |
|
Check out our web directory of the UK
roofing and cladding industry
www.roofinfo.co.uk |
Sign up for our monthly news letter. |
|
|
|

If you look closely at a roof covered with concrete interlocking tiles,
especially flat ones laid half-bond, you may see broken or missing
corners. Why does this happen, and should we be worried? The answer to
the first part is quite long, while the answer to the second part is
very short: yes.
The causes
The first cause is the design of the tile. For a concrete interlocking
tile to have a variable headlap, the side laps need to be formed within
the thickness of the tile body. With a profiled tile, the best place to
form the lap is where the corrugation rises, where the tile is at its
thickest.
With a flat interlocking tile, the lap has to be in the
thickness of the leading edge, therefore it has to be less than half the
thickness of the tile. At the thinnest point, the lap can be closer to
one third of the thickness of the tile. The reason for this is that
there are interlocks designed into the side laps to form drainage
channels, and these force the thinnest point to fall below the one half
thickness. Therefore, the interlock is the thinnest (and thus the
weakest) part of the tile system.
With some tile designs, there are cut back interlocks,
which allow the overlock to be strengthened, while others have a thicker
underlock. One or other interlock will be the weakest part of the tile.
The second cause is one of manufacture. Concrete tiles
are extruded as a long ribbon of concrete on a set of moulds that butt
up to each other. The concrete is so dry that there is no need for edges
to the moulds, and individual tiles can simply be cut with a knife. If
the knife is blunt or out of alignment, as it passes through the
concrete, it can pull the alignment of the extruded weather bars in the
underlock to the left. This is called lock splay. This will not happen
to the overlock, as it is formed in the mould and will not move.
If the ends of the interlock are not straight
when they are laid, the ribs that form the interlocks will not mesh
correctly and will ride up on one another. This results in the weight of
the tile – and the tiler – being taken by a small area of concrete in
the interlock, causing a stress fracture across the corner.
The third cause is during the curing of the concrete.
The tiles stay in a curing chamber for one to three days and are then
lifted from the moulds and stacked in the yard to cure for a further
three to four weeks. The longer they stand, the stronger the concrete
becomes. If demand is high, it has been known for tiles to be released
before they have completed their curing period. These tiles are termed
‘green’ and will be vulnerable to corner damage during transportation to
site. Often this damage is in the form of a hairline crack, which cannot
be seen. After a few cycles of rain and frost the crack begins to open
up.
The fourth cause is the roof structure. If the roof is uneven
(especially with half-bonded tiles), when the tiles are laid there is an
increased load on the vertical edges (and sometimes the opposite
corners), placing a higher load on the interlocks, especially when a
tiler walks across the tiles. He may feel a tile corner crack but be
unable to determine which tile fractured.
Placing the valley support boards above the
rafters and lifting the battens onto the support board, or kicking the
verge tiles up at the verge, or using the flashing supplied with a roof
window, can have the same effect. The roof structure should be as flat
as possible to ensure the interlocks meet correctly, and that the weight
is taken by the top and bottom edges. |
 |
The fifth cause is the fixing specification.
If tiles are head-nailed instead of clipped, high winds can lift the
tile and then drop it back into place. If done enough times the tile
will break at the weakest point first. By clipping the leading edge of
the tile, the wind will not be able to lift it in the first place.
The sixth cause is how the tiles are laid. The tile
design allows them to be pushed together or pulled apart by a few mm per
tile to keep the tile courses straight. If the tiles are pulled out too
far, the ribs in the interlock ride up on each other and lift the tile
on the right hand edge, taking a large amount of the load placed on the
tile. This load can break the interlock, especially if the tiles are
lifted by wind uplift or are walked on by the tiler.
The consequences
While one or more of these causes could contribute to the corner of a
tile breaking, it is the consequence of the breakage that is more
detrimental. There are four weak corners on an interlocking tile and any
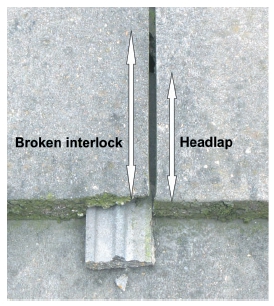
one could be affected. As soon as a corner breaks, it reduces the
effective headlap at that point, allowing wind-driven rain and water
seeping up the surface of the tile by capillarity to breach the headlap.
If the breakage is more than the headlap distance, there is a risk that
the water running down the headlap will drain onto the underlay and the
tile clip will have nothing to hold.
Breakage of the right-hand lower corner is very
obvious, while in the left-hand lower corner it is less obvious, as it
leaves a rectangular hole. The breakage of the two top corners is only
identifiable by dismantling the roof, so is therefore more serious.
All tiles with broken corners should be rejected
as unsuitable for use, but often there is a reluctance to do this, due
to project costs.
Conclusion
It is often impossible to define the exact cause of tile corner
breakage, therefore a pragmatic approach to the replacement of the tiles
should be adopted. If tiles with broken corners are knowingly installed
by the roofer then they are liable for the consequential damage, which
may take years to discover, and will tarnish the reputation of both the
tile manufacturer and the roofing contractor.
Tips
- Profiled concrete interlocking tiles
laid straight-bond tend to have stronger side interlock designs.
- Pack up the battens to eliminate any
deviations in the level of the rafters, and fit all valley support
boards between the rafters.
- Install the tiles using the correct
fixing specification, obtained from the tile manufacturer.
|
| Compiled
by Chris Thomas, The Tiled Roofing Consultancy, 2 Ridlands Grove,
Limpsfield Chart, Oxted, Surrey, RH8 0ST, tel 01883 724774 |
|