 |
 |
 |
 |
 |
 |
 |
|
Check out our web directory of the UK
roofing and cladding industry
www.roofinfo.co.uk |
Sign up for our monthly news letter. |
|
|
|

Wherever there is a room within a pitched
roof, there is likely to be at least one roof window installation. Each
window will be a penetration through the roof covering that will need to
be detailed and constructed correctly. Too often, the standard flashings
that are supplied are inadequate, or compromise the weathering of the
roof covering. The capabilities of the roof window flashings need to be
understood before they are used.
Types
There are two generic forms of roof window that are available, as
far as this discussion is concerned: those with an integral gutter and
flashing attached to the window frame, and those that have removable
flashings that differ with the type of roof covering that is used. Each
has its advantages and disadvantages.
The types that have an integral gutter around three sides,
and an apron flashing integral with the window frame, are more
watertight as they have no joints between the frame and the flashing,
but will not allow the use of soakers between double lap plain tiles or
slates, or an alternative lead cover flashing with interlocking tiles.
They are also either manufactured with a coated steel frame or an
injection moulded plastic frame; both of which have drainage channels of
a fixed size.
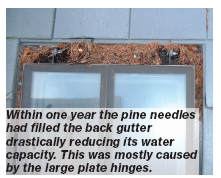
With the steel framed variety, there are large hinges which intrude into
the back gutter that trap snow and debris, and are heavier to open.
The windows with removable flashings tend to have a timber or extruded
plastic frame, to which the flashings are lapped and screwed, allowing
any alternative lead flashings to be used if the proprietary flashings
are not suitable. The gutter/flashing material is generally coated with
aluminium or zinc and needs to be supported, as it is very thin.
Rafter pitch
Generally, where there are rooms in the roof, the rafter pitch will
be fairly steep, but there are instances where, on a wide-span building
with a low pitch, roof windows are used to let light into the centre of
the building. While many roof window manufacturers claim that their roof
windows are suitable for rafter pitches down to 15°, it is often only
the window, not the flashings, which are suitable for the quoted minimum
rafter pitch.
Experience has shown that soaker installations
down to 22.5° can be trouble-free, while side channel flashings can be
trouble free down to 30°. The steeper the rafter pitch, the better.
Water run-off
The wider the roof window, the more rain-water will be collected in
the back gutter and drain down the side flashings of the roof window.
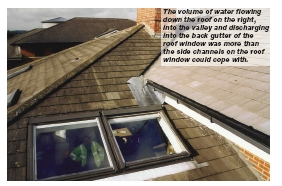
The greater the roof, and wall area above the
roof window, the greater the volume of rainwater that will drain into
the back gutter. But there is a limit to the amount of rainwater that
can be collected in a back gutter and flow down the gutter channels on
each side of the roof window, before the water floods over the edges of
the flashing.
Depending upon the pitch of the roof and the
actual size of the water channel, so the maximum area of roof draining
into the back gutter will vary. |
 |
|
To be safe, the maximum roof area draining
into the back gutter at 25° rafter pitch should not exceed the
equivalent of 10m2 (horizontal), and at 40° this could rise
to 15m2 (horizontal). There are no tables provided by the
roof window manufacturers to assist designers, as roof window
manufacturers only make one size of roof flashing drainage channel and
could not offer an alternative if required.
Flashing laps
Around the roof window, the tiles lap onto the side and back gutter
flashings by approximately 75mm, depending on the manufacturer, while
the apron flashing laps over the course of tiles or slates.
With the flashings that are not integral, there are
laps between the apron and side channels, and the side channels and the
back gutter. The laps between the various sections of flashings are
mostly only 75mm and, if the lap is increased at the bottom, it reduces
the lap at the top by the same amount. At 30° the 75mm lap appears to
give no problems, while below 30° water can back up through the 75mm
lap, especially if the drainage channel is blocked with leaves.
Experience and testing undertaken by the Lead
Sheet Association has shown that, at 30° a 150mm flashing lap of an
apron flashing is needed to prevent water creeping up between the
flashing and the top surface of the tile, allowing for a nail hole to be
positioned 38mm down from the head of the tile. Below 30° the length of
the flashing needs to increase to a maximum of 270mm at 15° true pitch.
In almost every case the apron flashing supplied is not capable of
achieving a lap of greater than 150mm and, with some high profile tiles
such as unders and overs, the flashing may only achieve a 50mm lap on
the crown of the corrugation and may not stretch down to the trough of
the corrugation.
The flashing lap between the side channels and
the tiles, in most instances, relies upon an upstand against which the
tiles should rest. Under the tiles there is often a foam insert and an
upturn on the edge of the flashing. If installed correctly when new,
this will keep out most of the rainwater that will flow down the side
channels. However, after a few years the foam does become impregnated
with algae and can shrivel up leaving gaps through which rain can enter
and run down and across the underside of the edge tiles. This situation
is worse at shallow rafter pitches.
Tips
- Choose, or construct, the side
flashings with a drainage channel that is set in the thickness of
the battens (not above) to allow the edge tiles to sit flat, and not
kick up
- Ensure that the side drainage
channels can cope with the volumes of water that will drain into the
back gutter, and are kept away from high level valleys.
- Windows that are installed into
shallow roof pitches need to have longer flashings to suite the true
pitch of the tiles or slates.
The second part of this article looks at
the installation of the roof window flashings. |
| Compiled
by Chris Thomas, The Tiled Roofing Consultancy, 2 Ridlands Grove,
Limpsfield Chart, Oxted, Surrey, RH8 0ST, tel 01883 724774 |
|