 |
 |
 |
 |
 |
 |
 |
|
Check out our web directory of the UK
roofing and cladding industry
www.roofinfo.co.uk |
Sign up for our monthly news letter. |
|
|
|

Part 3 of Verge Construction deals with
raking verges, and the issues that can arise.
Raking verge types
A raking verge is where the verge is not at right angles to the eaves or
the ridge, and can be at any angle.
There are two general types of raking verge: one
where water flows towards it, where the eaves is shorter than the ridge;
and one where water flows away from it, where the eaves is longer than
the ridge. Both are dealt with quite differently.
Where water flows away from the verge it is treated
like a verge, but where it flows towards the verge it is treated like an
eaves.
Raking verges of both types should be avoided
where ever possible. But due to the need to build up to a boundary line,
raking verges will occur from time to time. They can be constructed but
require a lot more tile cutting and a lot of thought to ensure they
perform correctly.
Raking verge (verge)
The fact that water is flowing away from the raking
verge in this instance means that depending upon the angle of the rake,
the head of the tile or slate will be cut away more than the tail. This
will result in the verge tile on some courses, especially with straight
bonded interlocking tiles, with both nibs and the nail fixing removed.
This will leave the tile very unstable and will need to be clipped.
While some manufacturers can supply double or
one-and-a-half tiles/slates for this situation, in most cases they will
not be available. In these instances it is essential that the head of
the tile is located by locking it to the adjacent tile interlock using a
C clip, which keeps the head up, and drilled and screwed at the tail
through into the batten below – coinciding the drilled hole with the
nail hole of the lower tile. The screw needs to be capped and sealed to
prevent water tracking down the screw. In all other respects the verge
is treated just like a normal verge.
While some dry verge systems will cope with a
raking verge of this type, many will not and therefore it is advisable
to check with the manufacturer concerned.
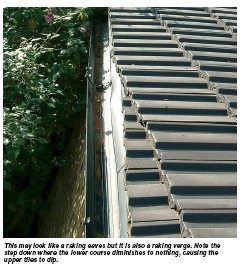
Raking verge (eaves)
Rainwater flowing over the verge means that, depending upon the angle of
the rake, the tail of the tile or slate will be cut away. This will
result in some instances with a step down from one course to another.
Because the lower edge of the tile may not rest on a lower tile it will
need to be supported on a timber barge board. While a raking verge can
be constructed with no barge board, it is easier with a barge board as
it acts like a fascia board. To keep the line of the verge straight the
barge board will need to be cut down in a saw tooth effect, or packed
up; to keep the tiles straight as the cut diminishes.
Water that flows off the tiles should be collected in a
gutter fixed to the barge board. Without a barge board this is not easy
to achieve.
Underlay
Like water on the top surface of the tiles/slates, water on the underlay
will also flow towards the raking verge and will need to be controlled. |
 |
Either it should be channelled down behind
the barge board or be allowed to pass over the barge board into the
gutter. If the water is to pass over the barge board into the gutter
there will need to be a tilt fillet to support the underlay. For this to
work the battens need to be kept back from the barge board by 100mm to
allow the underlay to rise up to the underside of the tiles. Therefore,
there needs to be a raking rafter at that point to provide something to
nail the ends of the battens into. This is not always possible. The
channelling of the water down the back of the barge board is a much
simpler option as the 6mm-thick support board can be laid directly on
the raking rafter with the underlay turned up the back of the barge
board.
Provided the battens finish 10mm short of the
barge board, any water will pass between the batten end and the barge
board. Do not forget to allow for an outlet at the eaves to let any
water behind the barge board escape. With both details the verge is not
mortar-bedded and therefore an eaves comb may be needed to prevent small
birds, bats and large insects from getting into the roof.
Fixing
As with all perimeter tiles and slates they will need to be mechanically
fixed. Head nailing the tiles, or centre nailing the slates, is no
problem, but if the tiles need to be clipped, verge clips will need to
be used and may need to be modified to fit depending upon the position
of the cut. Preferably verge clips should be located at right angles to
the raking cut to discourage rain from tracking back along the clip, but
having a suitable batten to fix to may be more difficult.
While some dry fix verge systems may look as if
they can cope with this form of raking verge, they are not designed to
cope with the increasing volume of rainwater that will discharge over
the verge into the dry verge system, and therefore none are suitable for
this situation.
Tips
- Mortar bedding can be used if the
water runs away from the verge.
- Where water flows over the verge it
should be collected in a gutter.
- All cut tiles down the raking verge
will need to be mechanically fixed.
|
| Compiled
by Chris Thomas, The Tiled Roofing Consultancy, 2 Ridlands Grove,
Limpsfield Chart, Oxted, Surrey, RH8 0ST, tel 01883 724774 |
|